My everyday hair products (how I keep my hair healthy)

image1

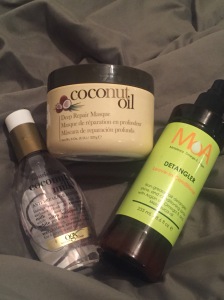
These little beauties are my hair life savers. I have used these products (not always same brand) for about 8 months now, and they have made such a difference.

The coconut oil is something I use once a week. (I do not always buy the same exact coconut oil.) It is what I use for my weekly hair mask. I coat my hair with A LOT of coconut oil, wrap it in cling wrap, and sleep with it on. I get up in the morning, rinse my hair, and just use conditioner on it.

The detangler, I do not always use the same brand. I honestly picked this one up because it has aragn  oil in it. One thing that I do that many people do not is that no matter what detangler I use I put a little of the coconut oil from the tub in it and shake it up. I do this because I want to put coconut oil in my hair everyday, but not like doing a mask

Coconut milk, I LOVE this product. I have been using this the longest of the three. It keeps my hair looking shinny and healthy. I also use it on my six year old daughter’s hair because putting a little oil in your child’s hair actually helps prevent lice. I recommend using this on your hair after you have showered. Put it in after you towel dry, but before you brush in addition to the detangler. Using the two together helps detangle your hair, and that helps reduce breakage.

One other thing I would recommend that is not pictured is argan oil. I used to use this everyday as well, but ran out about a month ago, and just never picked anymore up. I fully intend on buying more, because it is the one product I used even before the coconut milk. I actually used to mix the two together and put it in my hair.
Five Minute Overnight Heatless Curl Part Two: Your Questions Answered.

Yesterday I received a question from a reader about my five minute overnight heatless curl tutorial. (View Original Post Here) She tried it out and got beautiful curls, but had a few questions. Here is what she wrote:

“Hey girl I tried your blog about curly hair and I have long thick hair and I didn’t know if there was an easier way to do it without the band being so full and the hair tangling and without it being frizzy (I wrapped it with a scarf) the curls turned out great on the middle and the bottom but the tops were frizzy. Also, do you do a lot of medium pieces or large strands?”

These are great questions, and honestly, something I should have addressed in the first post.

I just wanted to say again that I have thick hair that does not hold a curl, and this is the only way I have found so far that keeps my hair curly all day long.

First I would say instead of using a scarf, try a bandanna. That is actually what I normally use. You want to use something that ties so in the morning you can untie it and slide it out through the curls instead of having to try to get a headband out of them.

Second, I would say once every five wraps, to grab the part already wrapped around the bandanna, and slide it toward your face, so that by the time you make it to the back, you have enough room.

Third, if you are anything like me you move around in your sleep and that will cause the top to be frizzy. I like to wrap a scarf over my head, and then take cling wrap and wrap it around that once or twice. The reason for this is that just wrapping a scarf is still cloth rubbing on cloth when you move around and the scarf may move and still cause some frizz. Another thing that may help is to put a little moose in it right before you start wrapping it. This will help the style hold as well.

Last, as for the amount of hair, I usually use about a 2 to 3 inch wide section to start. I wrap it around and add another section of the same size to it.

5 minute overnight heatless curls.

11000579_10204698205558450_8298358254745665314_n 11698407_10204760175787667_2944026554411403472_n

I am a big fan of not putting heat on my hair. I rarely straighten my hair, and have found that when I know I am going to wear my hair down that doing this quick fix the night before works well for me.

So I have that type of hair that falls flat just five minutes after curling it with a curling iron. I’ve always been jealous of the girls who can put a curling iron in their hair for a few seconds, dust it with hair spray, and go. It takes me hours to curl my hair, and it only lasts about 2 hours.

11696356_10204755058019726_7062532378833705995_o

(My normal straight hair)

So, I started looking for a way to get that curly hair I have always wanted, and I finally found it. I did not have time to film a video tutorial for you, so I snatched one for you. You can find the link at the very bottom of the post.

READ THE TEXT BELOW THE PICTURE BEFORE YOU ATTEMPT THIS

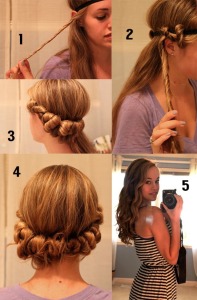
heatless curls

I find that this picture most accurately shows how to wrap your hair I do find that there are a few important things it leaves out.

1. Your hair needs to be damp, but I am talking damp like if your hair was dry and you sprayed some detaingler on it. This is important because if your hair is too wet, you will not get curls.

2. No matter how you part your hair during the day, part it down the middle when you are doing this and just move your part in the morning. If you do not have equal amounts of hair on both sides, one side of your head will have smaller curls than the other side.

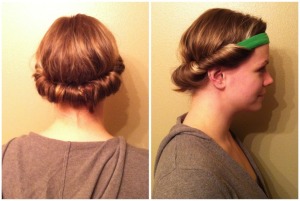
3. Most importantly, do not twist your hair like the picture is showing. Just wrap it around (TIGHTLY), add hair, wrap, add hair…etc. Twisting it actually makes it less likely to dry, and less curly. I never twist mine. Like the girl below.

heatless2

So when you are done it should look like this

heatless3

I recommend wrapping a scarf or something around it before going to bed to help keep your curls from getting frizzed up.

Take them down in the morning and…

11000579_10204698205558450_8298358254745665314_n 11698407_10204760175787667_2944026554411403472_n

Here is the link to the youtube video

Product Reviews: e.l.f cream eyeliner, e.l.f mist & set, and MAC prep & prime eyelid primer

So I have recently purchased and tried out these 3 items. I like all three of them, but like everything else there are pros and cons.

The elf cream eyeshadow (only $3 at Target) goes on smoothly, but persoannly I felt like it went on really …transparent… I had to go over it with a black eyeshadow to get the dark black color I was wanting.

The MAC eyelid primer (not cheap), is amazing. I have tried a few different brands, but so far this is my favorite (I have yet to try Urban Decay but I have been told that once I try it I will throw my MAC away)

The e.l.f mist & set (only $3 at Target) … well it stinks, and it is sticky. I feel like my makeup didn’t stay any better than it usually does, and i have no intention of using this again.

SONY DSC

SONY DSC

SONY DSC

Purple hair, don’t care.

Ok, ok, I have lead you all on for to long, but enough is enough. I tallied your votes and……

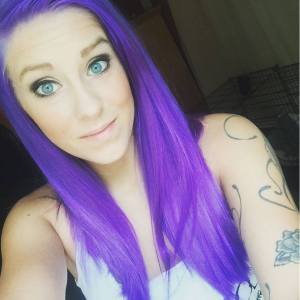
I have dyed my hair purple! I absolutely love it! I have to say, I think you guys did great at picking a color that suits me well.

So I went from this..

cropped-11000579_10204698205558450_8298358254745665314_n.jpg

to this…

11696356_10204755058019726_7062532378833705995_o

What do you all think? It was definitely a journey to get it to this point as I had to bleach it, but I think it turned out very well.

How to become a professional makeup artist/ hairdresser…

I know this says “how to”, but I like to refer to this as my 5 year plan. I am hoping that by setting this out now, I can look back on it as something to remind me of where it is that I want to be.

I do not see myself as your normal, cosmetologist. While I plan to work in a salon, I actually want to focus on event makeup and hair. I know, I said and hair, and you are probably freaking out a little right now because everything you have ever read says you need to choose one and focus on it, but I am not buying that.


Picture this, you are getting married and you have to hire someone to do your nails, hair, and makeup. Also, what about your maid of honor and bridesmaids, are you going to pay for that for all of them too? Psh, just hire my company.

Airbrush starts out at $60 per person, but if you are paying for 3 or more it drops down to $45, and if you are paying for 6 or more it drops down to $35. (and yes, this does include your test run)

Hair needs to be done? Same basic principle, starts out at $60 and goes down…

Nails? Starts out at $20 (for hands) $25 (for feet) and only $40 for both… and the more people the cheaper it gets.

But honestly, that is still crazy expensive right?

Well, we offer packages. Packages start with 5 women in your party at $450, 6-8 women $550, and 8-10 women $650

So what if me, and the other person I am working with spend 6 hours there. For a 5 person party we would both average $37.50 an hour…


Ok,ok, I am sure you get the point, but how do I plan on getting to that point? Well, get ready for my plan.

  1. This is probably the most obvious, I am in school to become a certified cosmetologist.
  2. Weekend workshops are your friend! I have already found a 2 day advanced airbrush makeup workshop that I have every intention on attending.
  3. Invest in a good camera! What better way than to show your amazing work, than with a camera that can capture all of the little details.
  4. PRACTICE! I am already making a list of friends and family in my head that will let me do their hair and makeup, just so I can take pictures of it. Who doesn’t want to get pampered for free?
  5. Build a portfolio. You didn’t buy that expensive camera, and spend all of those hours practicing for nothing. I personally recommend purchasing a domain and setting up a website, and number 6 will show you why. Nothing makes people want to hire you more than having a well designed website to show off your talents.
  6. NETWORK/PUBLICIZE! Get that portfolio out there. Hand out business cards, get your friends to share on Facebook, Twitter, Tumblr, and etc. I mean, wouldn’t you be curious if I handed you one of these beauties?

business cards      7. Collaborate. One idea that I LOVE, is to pair up with an up and coming photographer. You both need to build your                portfolios, so find some women, dress them up, do their hair and makeup, and take fabulous pictures…duh!

8. Last but not least, be PROFESSIONAL. Be on time, be polite, do what you came there to do, and do it well!

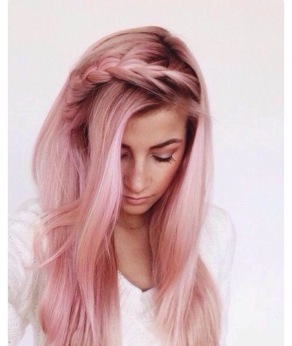
Pastel hair, the trend I wanted to hate, but I just can’t.

pinkpastelhair

I seriously wanted to hate it. Everything inside of me thought, “Her hair is pink. Why in the hell do I love it so much?”

But that is just it, I totally love it I have decided I will be trying this color out at some point, because I just love it so freaking much. Right now, it is actually the color you all have voted for the most, so it may be sooner than later that I get to try it out. Have any of you tried pastel, and if so did you love it or hate it?

Covergirl Bombshell Volume by Lashblast Review

covergirlbombshell

I am sort of a mascara junkie, and so I run through them quite often. I have pretty long eyelashes, and I usually try to find a mascara that will get the job done without falsies. I LOVED this mascara when I put it on. It looks beautiful, and I honestly did not feel like I needed falsies at all. It wasn’t until I went to remove the product that I realized how awful it is.

Mascara? More like black super glue!

R.I.P to the eyelashes I lost trying to get this stuff off. I tried everything, from baby wipes, baby shampoo, face wash, lotion, and oil makeup remover, but that still did not get it all off. It took days for this stuff to come off, and it made my eyelashes so stiff they actually got sore, and I didn’t even know that was a thing.

Needless to say, would I recommend this? Absolutely not. I value my eyelashes to much.